MacOS (Hackintosh) 使用笔记
自从苹果采用 Intel 的处理器,OS X 被黑客破解后可以安装在 Intel CPU 与部分 AMD CPU 的机器上
出现了一大批非苹果设备而使用苹果操作系统的机器,被称为黑苹果(Hackintosh),在 Mac 苹果机上面安装原版 Mac 系统的被称为白苹果(Macintosh)。
安装教程
我的机型:ACER-E5-575G
wifi、蓝牙、隔空投送 无法使用(可更换网卡一次性解决)
更换网卡比较贵,我的解决方案是使用外置 usb 网卡(将内置的网卡直接拆除)
独立显卡 无法驱动(无解)
精选几个接近完美的 EFI 配置文件:
① Acer E5 575g I5 7200U HD620 安装 Mojave 整理分享 EFI(不支持 VGA 输出,电池下无法睡眠)
镜像:macOS Mojave 10.14.2 18C54
② Acer E5 575G i5+7200u+hd620+Alc255 安装 10.13.4 (麦克风无法使用,HDMI 音频输出异常)
镜像:macOS High Sierra 10.13.4 17E199
③ Davix2301 ACER-E5-575G-Hackintosh(不支持视频输出)
镜像:macOS Mojave 10.14.6 18G84
④ 作者还未在远景论坛分享( 魂牵梦 Mong 说他处女座都表示舒服)
镜像:macOS Catalina 10.15.3 19D76 ⚠️ 10.15 存在软件兼容性问题
镜像下载:黑果小兵的部落阁
安装教程参考:联想小新 Air 13 黑苹果安装教程
踩坑总结
- Mac 安装系统提示应用程序 副本已损坏, 不能用来安装 macOS(实用工具 -> 终端 date 修改时间)
- 亮度 无法调节(现已无该问题)
- Intel 蓝牙 无法关闭
- WIFI 无法使用:19.80¥ 买了个外置 usb 网卡(或者直接更换电脑网卡同时解决蓝牙的问题)
- 插入 3.5mm 耳机 声音输出异常(在设置中把声音输出的 平衡 调为最左或最右)
- 无法使用手机 usb 共享网络(安装 HoRNDIS 后重启)
- 把 ipad 作为 扩展屏(安装 xdisplay 或 duet,前者免费,后者移动端收费,10.15 增加了随航功能)
- 从网上下载的应用无法打开(开启应用任何来源)
- 无法读写 NTFS 格式硬盘(安装 Tuxera NTFS for Mac,双系统太方便了!)
- 精简 clover 启动项(安装 Clover Configurator,在引导界面里面设置添加隐藏卷 Recovery、Preboot)
- 键盘 稍有不同(Alt -> command,win -> Option,还可在键盘设置里将 Caps Lock 改为 Esc)
- HiDPI 是什么?以及黑苹果如何开启 HiDPI
开启应用任何来源
有的时候从网上下载的应用无法打开,提示 应用已损坏
这是系统为了加强安全机制,默认不允许用户只能使用从 App Store 里下载的应用
解决办法:sudo spctl --master-disable 输入密码即完成

打开 系统偏好设置 » 安全性与隐私 ,左下角输入密码解锁,可选择来源
sudo trimforce enable 开启固态硬盘 TRIM
卸载自带应用程序
在终端中 执行 sudo -i 输入密码cd /Applications 打开程序目录ls 查看系统自带软件
还有一部分在 Applications/Utilities
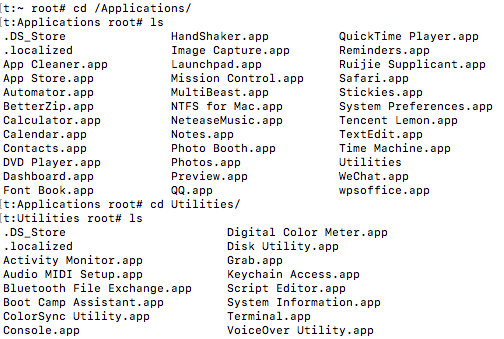
执行 rm -rf [程序名] 即可删除应用
如:rm -rf Maps.app 删除地图
如果无法卸载,则是 SIP(系统完整性保护) 没有关闭,解决办法如下:
重启电脑,在过程中按住 command + R 或者进入 clover 引导 选择进入 恢复工具界面
上方打开 实用工具 » 终端,执行 csrutil disable
卸载完后记得打开保护,执行 csrutil enable
关闭 nsurlsessiond 进程
nsurlsessiond 是 macOS 后台自动更新的线程,经常会占满带宽
1 | /bin/sh |
使用 TripMode 解决 MAC nsurlsessiond 狂走流量问题
禁止.DS_store 生成
” .DS_Store,英文全称 Desktop Services Store,是 Mac OS 中保存文件夹自定义属性的隐藏文件,目的在于存贮文件夹的自定义属性,例如文件图标位置、视图设置,或背景色等,相当于 Windows 下的 desktop.ini。.DS_Store 默认放在每个文件夹的下面,这给我们带来了诸多不便…“

https://www.jianshu.com/p/f83e85443c50
不用關閉 SIP 也可以用 Asepsis ,在 El Capitan 下解決 .DS_Store 悲劇!
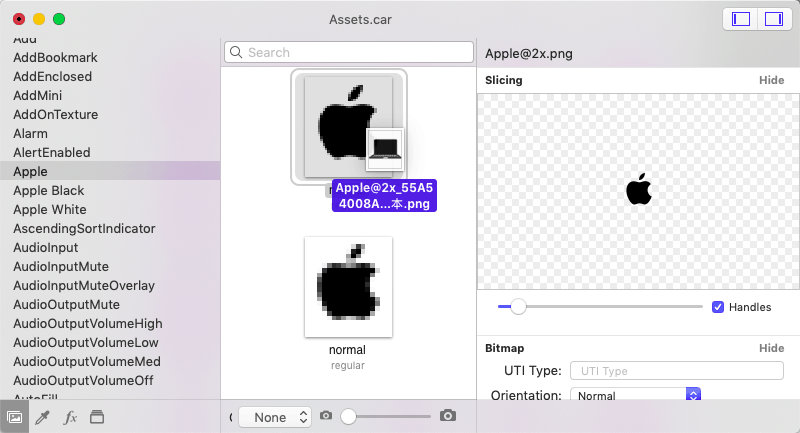
修改状态栏苹果 logo
关闭 SIP(系统完整性保护)
csrutil status查看 SIP 状态disabled 表示系统完整性保护处于关闭状态
在访达中按快捷键
Shift+Command+G前往目录:/System/Library/CoreServices/SystemAppearance.bundle/Contents/Resources/Assets.car
备份文件 Assets.car 到桌面或者其他用户目录下(否则无权限修改文件内的苹果图标)
下载 ThemeEngine ,用于打开修改 Assets.car 中的图标文件

按住元素预览图标拖拽到其他目录即可备份
拖入要替换的图标后保存文件,再将修改完的 Assets.car 覆盖到
/System/Library/CoreServices/SystemAppearance.bundle/Contents/Resources/
重新登入后即生效
替换 电脑-> Macintosh HD-> 资源库-> Desktop Pictures 里的文件可修改登入界面壁纸
调整启动台图标大小
调整每一列显示图标数量defaults write com.apple.dock springboard-rows -int n
调整每一行显示图标数量defaults write com.apple.dock springboard-columns -int nn 为你想设置每一行或者每一列图标的个数
修改后重置生效Launchpaddefaults write com.apple.dock ResetLaunchPad -bool TRUE;killall Dock
解决双系统时间不一致
安装完黑苹果后,切换 Windows,发现时间跟 macOS 下不一样,总慢八小时, 是因为两个系统读取时间的方式不一样
windows 下 管理员模式 运行 cmd 或者 powershell,输入以下命令:Reg add HKLM\SYSTEM\CurrentControlSet\Control\TimeZoneInformation /v RealTimeIsUniversal /t REG_DWORD /d 1
重启解决问题,这也适用于一些 linux 和 windows 共存的时间问题
安装常用程序
Homebrew
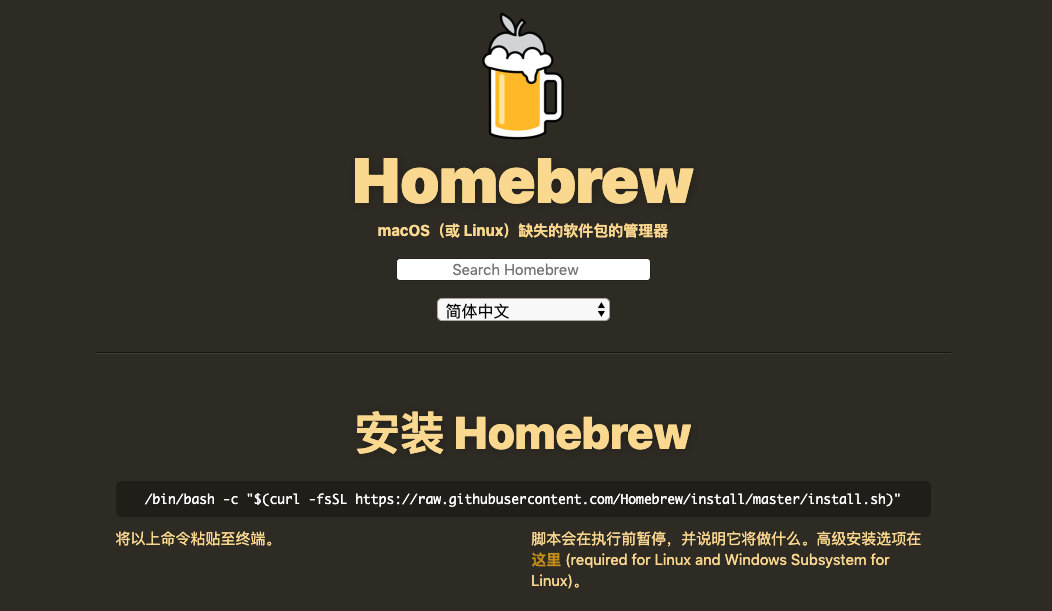
Homebrew 是 macOS 缺失的软件包的管理器,拥有安装、卸载、更新、查看、搜索等功能
官网:https://brew.sh/index_zh-cn
安装前先安装 Command Line Tools for Xcode
终端执行 xcode-select --install
安装好后,执行:/usr/bin/ruby -e "$(curl -fsSL https://raw.githubusercontent.com/Homebrew/install/master/install)"
如果提示 curl: (7) Failed to connect to raw.githubusercontent.com port 443: Connection refused,更换网络环境再尝试
1 | ➜ ~ brew -v |
brew 所安装程序的位置:
配置文件在 /usr/local/etc
安装文件在 /usr/local/Cellar
二进制可执行程序的软连接在 /usr/local/bin
Homebrew Cask 是 Homebrew 的扩展,借助它可以方便地用命令行管理 macOS 应用,它是将应用直接移动到 Application 文件夹,这与我们自己去官网下载安装是一致的
1 | ➜ ~ brew search chrome |
安装谷歌浏览器:brew cask install google-chrome
git
brew install git
Node.js
之前下载安装包安装过,通过 brew 安装时提示:
1 | ➜ ~ brew install node |
1 | ➜ node brew link --overwrite node |
sudo chown -R $(whoami):admin /usr/local 赋予权限后即可链接成功
Vim
brew install vim
基于 Vim 的超扩展文本编辑器
brew install neovim
figlet
brew install figlet
1 | Hackintosh:~ hcj$ figlet Hackintosh |
ranger
https://ranger.github.io/index.html
brew install ranger
fish
Finally, a command line shell for the 90s
brew install fish
按
Ctrl+F或者 右方向键→, 即可自动补全
设置 fish 为默认 shell:
sudo vim /etc/shells,添加 /usr/local/bin/fish
1 | # List of acceptable shells for chpass(1). |
chsh -s /usr/local/bin/fish 更换 shell
fish 插件管理:oh-my-fish
fish_config网页可视化配置
oh my zsh
macOS 10.15 前终端的默认 shell 为 bash,但自带了 zsh

安装 oh-my-zsh (切换到 zsh 后进行安装)
1
2
3
4
5
6
7
8Shell successfully changed to '/bin/zsh'.
__ __
____ / /_ ____ ___ __ __ ____ _____/ /_
/ __ \/ __ \ / __ `__ \/ / / / /_ / / ___/ __ \
/ /_/ / / / / / / / / / / /_/ / / /_(__ ) / / /
\____/_/ /_/ /_/ /_/ /_/\__, / /___/____/_/ /_/
/____/ ....is now installed!
Please look over the ~/.zshrc file to select plugins, themes, and options.更换 主题
下载 powerlevel10k(需要安装 Hack Nerd Font 字体和配置)
编辑
~/.zshrc,修改ZSH_THEME="powerlevel10k/powerlevel10k"安装插件
git clone https://github.com/zsh-users/zsh-syntax-highlighting.git ${ZSH_CUSTOM:-~/.oh-my-zsh/custom}/plugins/zsh-syntax-highlightingzsh-autosuggestions 自动补全
git clone https://github.com/zsh-users/zsh-autosuggestions ${ZSH_CUSTOM:-~/.oh-my-zsh/custom}/plugins/zsh-autosuggestions下载后编辑
~/.zshrc,添加:1
2
3
4
5plugins=(
git
zsh-syntax-highlighting
zsh-autosuggestions
)执行
source ~/.zshrc后重启 zshzsh-incremental 提示补全
brew install wgetwget -O incr-0.2.zsh https://mimosa-pudica.net/src/incr-0.2.zshcp incr-0.2.zsh ~/.oh-my-zsh/plugins/- 添加
source ~/.oh-my-zsh/plugins/incr*.zsh到~/.zshrc中
iTerm2 - 自带终端的替代品
Bartender - 菜单栏图标管理工具
Alfred - 强大的工具台(需要开启 Spotlight)
win10:Wox + Everything
iPic - 图床、文件上传工具
Snipaste - 截图神器
IINA - 免费开源强大好用的播放器
MagicanRest - 定时提醒
Paste - 剪切板管理器
Text Scanner - 文字识别
ScreenFlow - 录屏编辑软件
Permute - ”格式工厂“
PhotoScape X - 多功能图片处理软件
Typora - a markdown editor
Magnet - 窗口管理
Downie 3 - 视频下载工具
Karabiner-Elements 改键神器
卸载方法:Preferences - Misc - Uninstall Karabiner-Elements
Renamer 文件重命名
SSDReporter 固态硬盘健康检测
Caffeine 防止显示器熄屏
DaisyDisk 磁盘分析
Asepsis 禁止 .DS_Store 生成
a smart solution for .DS_Store pollution
常用快捷键
通用
Command + X剪切Command + V粘贴Command + Shift + V去格式粘贴Command + Z撤销Command + Shift + Z重做Ctrl + H等于 Delete (Backspace)Command + C拷贝(Copy)Command + A全选(All)Command + S保存(Save)Command + F查找(Find)
Command 大多数情况下相当于 Windows 下的 Ctrl
Finder
Space预览所选文件Return/Enter重命名所选文件Command + O打开文件Command + ↑打开上一级目录Command + Shift + .显示隐藏文件Command + Shift + N新建文件夹Command + Shift + G前往绝对路径Command + Delete(Backspace)将文件移至废纸篓Command + Shift + Delete清倒废纸篓
应用窗口
Command + Tab在应用程序间切换Command + Shift + Tab在应用程序间反向切换Command + N新建当前应用窗口Command + ~在应用中的窗口间切换Command + H隐藏(Hide)当前应用程序窗口Command + Option + H隐藏其他应用程序窗口Command + M最小换应用程序窗口,最小化的窗口无法再直接切换出来,需要按住 OptionCommand + Q退出(Quit)当前应用程序Command + Option + esc打开强制退出窗口
截图
Command + Shift + 3截取全部屏幕到文件Command + Shift + Control + 3截取全部屏幕到剪贴板Command + Shift + 4截取选定区域到文件(按空格捕捉单个窗口)Command + Shift + Control + 4截取选定区域到剪贴板,我通常使用 Snipaste 来截图
浏览器
Command + L对焦至地址栏Command + T新建标签页Command + W关闭标签页Command + Shift + T撤销关闭标签页Control + Tab标签页切换Control + Shift + Tab标签页反向切换Command + '='放大页面Command + '-'缩小页面
文本
Command + B加粗文字Command + [方向键]光标快速跳转Option + →将光标移至下一个单词的末尾Option + ←将光标移至上一个单词的开头Control + A移至行或段落的开头